I wrote recently about completing part one of the NAND to Tetris course. This first part of the course is focused on building up from basic logic gates (NAND) to a working computer architecture that includes a CPU, a ROM unit for storing the program being executed, and a RAM unit that provides the computer’s working memory, as well as the interface for controlling the screen and reading from the keyboard. These components together form the Hack computer architecture, which executes binary programs using the Hack instruction set.
What does “building a computer” really mean? Well, instead of assembling circuit boards and soldering connections, connecting external devices to serial ports and plugging in the power, each component of the computer was built and tested using a software emulator. Here’s what it looks like:
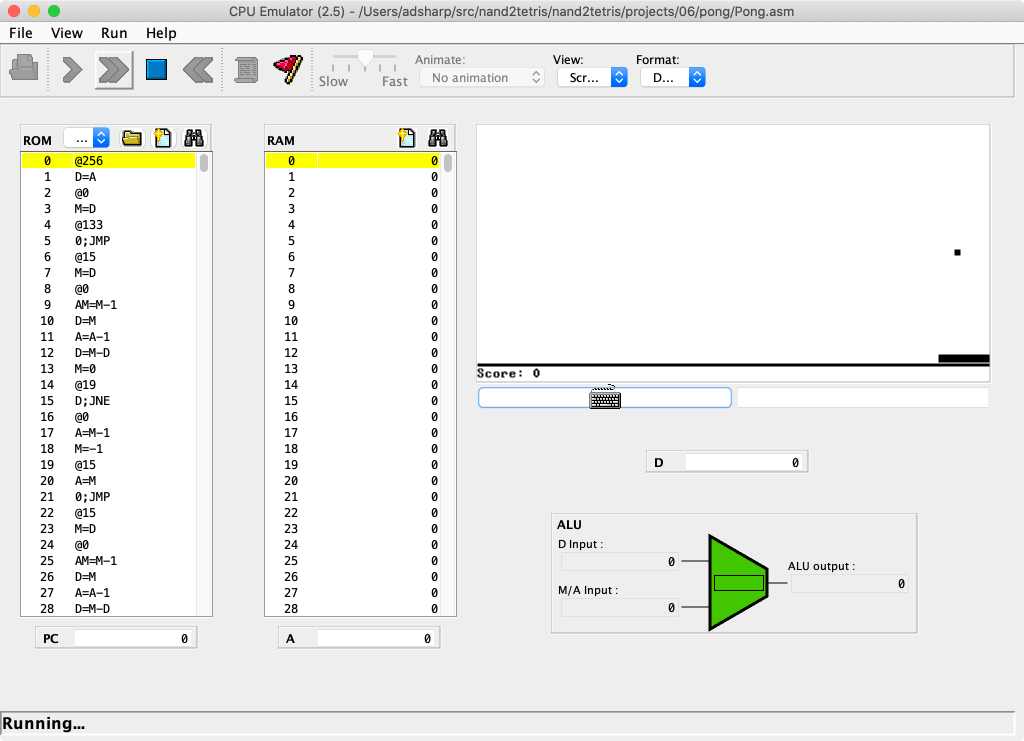
You launch the emulator, open a .hack file on your computer, and click a button to start the computer running. There are panes for viewing the program disassembly, inspecting the contents of RAM, viewing the screen and checking the state of the CPU’s registers.
The emulator itself is a regular program that executes on my Mac. How does it work? Well, I haven’t delved into its source code, but I know that it’s a Java program (which explains its idiosyncratic UI). The course’s software suite includes shell scripts that set up the correct Java CLASSPATH before launching the real program.
All this got me dreaming: what would it take to write my own Hack emulator as a real Mac app, in Swift, that could read .hack programs and handle keyboard input and drawing using Cocoa APIs? This would be nowhere near as ambitious as Jordan Rose’s escapade to run Swift programs on Mac OS 9, but it would be really fun and hopefully show me a different perspective on what I’ve learned so far.
The Hack screen
Building the entire CPU emulator is a big project, so I decided to begin with the Hack screen interface. Here’s how Hack programs update the screen:
- There’s no operating system APIs or device drivers. At the end of the day, programs just have about 16K of addressable RAM. 8K of that RAM is screen memory. Changing values in this memory causes the display to update.
- The Hack screen is a fixed size, monochromatic display. It’s 512 pixels wide and 256 pixels high, and each pixel can be either on or off. If we represent each pixel as a single bit, that’s 512 × 256 = 131,072 bits. Hack is a 16-bit computer, so each addressable unit of RAM is 16-bits wide. 131,072 / 16 = 8,192 = 8K bytes.
- Because we can only address 16 bits at a time, to set the top-left pixel on the screen to on, we use something like the following logic:
D         = SCREEN[0]     // 1. Load the value at SCREEN[0]
SCREEN[0] = D | (1 << 15) // 2. Set the most significant bit
                          //    to 1 and store the result
Modelling the screen in Swift
Ultimately, to get the same semantics as the Hack computer, I want an API that resembles this as closely as possible:
- We want to draw to a Mac window. The simplest thing here would be an
NSViewsubclass that is a fixed 512 × 256 size (points this time, not pixels). Drawing can probably done using Core Graphics. - Memory is basically a big array of 16-bit numbers, so that will either be
Arrayor some other customRandomAccessCollection. - Changing any element in this array should cause the corresponding 16 “pixels” (points in practice, for resolution independence) to be redrawn with the correct colour: white for off, black for on.
- Bonus points: inverted colours in dark mode. Let’s use
NSColor.controlBackgroundColorfor off, andtextColorfor on.
Here’s the public API for our new HackScreenView class:
public final class HackScreenView: NSView {
  public var memory: Memory

  public init() {}
}

extension HackScreenView {
  public struct Memory: RandomAccessCollection, MutableCollection {
    public typealias Element = UInt16

    /* collection implementation omitted */
  }
}
That’s really all there is to it. Here’s that pseudo code from above converted to Swift:
let view = HackScreenView()
// assume this is added to a window and displayed

view.memory[0] |= 1 << 15 // set the first pixel to on
Not so bad!
Rendering
OK, so actually that’s a pretty terrible API for drawing to the screen, but that’s why I’m now learning to write a compiler, stack-based virtual machine and operating system to generate the code for me in NAND to Tetris part two. (Seriously.)
How does the rendering work in Core Graphics terms?
- We have to map the big array of
UInt16to our rectangular coordinate space somehow. You can consider this to be a 2D array of 256 rows, each containing 32 columns of 16 bits (feel free to check those sums for yourself). - To draw the screen, we can proceed left-to-right, top-to-bottom, loading the corresponding
UInt16for each segment, then iterating over each bit and filling with the appropriate colour based on whether it’s 1 or 0.
Here’s the whole draw(_:) implementation. For extra extra points, I wrote some code to only invalidate the portion of the view where the screen memory actually changed, so we can use dirtyRect to draw the smallest amount possible. (There’s a custom subscript(row:column:) on Memory that takes a row and column and does the calculation to map that onto the linear array of bytes.)
override func draw(_ dirtyRect: NSRect) {
  for row in stride(from: dirtyRect.minY, to: dirtyRect.maxY, by: 1) {
    for column in stride(from: dirtyRect.minX, to: dirtyRect.maxX, by: 16) {
      let byte = memory[row: Int(row), column: Int(column) / 16]
      for offset in 0 ..< 16 {
        let isOn = byte & (1 < 0
        let color = isOn ? NSColor.textColor : .controlBackgroundColor
        let x = column   CGFloat(offset)
        let rect = NSRect(x: x, y: row, width: 1, height: 1)
        color.setFill()
        rect.fill()
      }
    }
  }
}
The end result
I wrote a fun little method to respond to pressing the space bar by picking a random pixel and then flipping all the bits in a square around that pixel. Here’s what it looks like!